Back to the Main Page
Astronomical Resources
Optical Configurations
My Telescopes
Credits, Disclaimers & Accolades
About Me
The Obligatory Links Collection
Email me
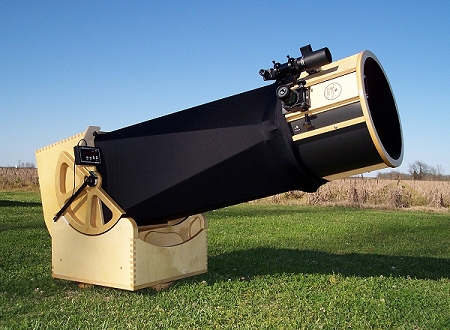 The Introduction After having used the 10" f5.5 Dob that I built in 1991 for more than twelve years, I was starting to notice the telltale signs of aperture fever. I tried to innoculate myself with observing projects, and for a while I was successful. The Herschel 400 yielded to this scope, for the most part. However, by century's end I found myself looking at various websites featuring names like Starmaster, Obsession, StarSplitter, Discovery and others. "Just a few more inches of aperture", I told myself. However, I managed once again to quell any illusions of grandeur. For a while. Then, in 2003, a dear friend passed away and left me a 14.5" f4.5 Sky Designs Dobsonian. After using this scope for a while, it became obvious at the very least I'd need to do some further repair on the it, since it had accumulated knocks, dings and a certain degree of damage over the years (not to mention being blown over one afternoon at the Texas Star Party). The more I looked, the more there was to do, it seemed. And then, I got a nice close look at a few TeleKits from AstroSystems in LaSalle, CO. They were NICE! And no matter who assembled them, the quality was consistently high, which speaks well of the actual kit quality, given variances in individual skill. The quality of the wood, construction, design and overall appearance were as good as any telescopes I'd seen, bar none. And so it was - When I returned from the Texas Star Party in May of 2003, it took about a week for me to decide to call Randy Cunningham at AstroSystems and order mine. Their website predicts delivery in two weeks to three months, and Randy told me to count on three months just in case. No matter, since he immediately mailed the assembly manual to me and I spent many an evening looking over it in advance, just to become as familiar with the kit as possible. The first box arrived in late December, followed by a few more shipments over the next month or so. The last component to arrive was the Quickswitch filter slide in February, since AstroSystems was apparently dependent on someone else's production run for the actual filter holder piece. I ordered a Rigel Systems QuikFinder (instead of a Telrad) and a secondary mirror DewGuard from AstroSystems in addition to the kit. I didn't opt for the upgrade to a Feathertouch focuser, though. Rounding out the scope was an Orion 9x50 RACI in a Losmandy ring mount. I won't try to describe the entire assembly process in extreme detail - There are excellent descriptions of that already on the web (see the TeleKits page on the AstroSystems website for links). Hopefully, though I'll be able to present a general idea of what it's like to assemble and use one of these fine scopes. The Parts I think my wife had second thoughts about her blessing on my endeavor when she saw this collection of parts in her living room! 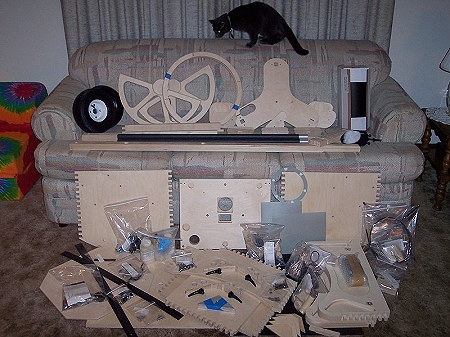 And, there were still a few pieces yet to arrive. The wooden parts are beautifully CNC routed from 13 to 15 ply Russian Baltic Birch plywood. This wood is hardwood veneer and core, with virtually no voids (I think I filled only about 4 or 5 very small spots over the entire scope). This wood is also very moisture-resistant. I live in Louisiana ('nuff said, moisture-wise), and despite being unprotected in my carport and/or storage building for three months, a raw piece of scrap ply from Randy exhibited NO signs of warping or other damage. All of the parts, wood and hardware, were packed very well and sustained no damage en route. In fact, there were so many plastic "peanuts" around the house for a while that I had to be careful not to let our cats get into them! It was very much like Christmas morning as I went through the boxes with all that Incredibly Neat Stuff in them... The Assembling 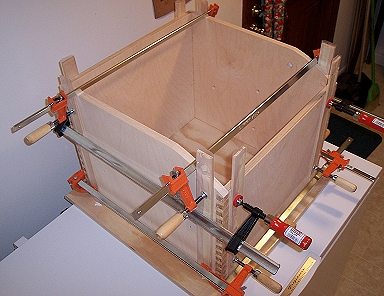 The fundamental fastening method on a TeleKit is epoxy, epoxy and some more epoxy. It works very well, but just get ready to spend some quality time with the sticky stuff. As the manual states, it makes a great gap filler - Note the epoxy filler in between the (not yet fully sanded) finger joints of the rocker box. 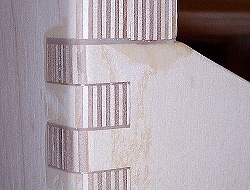 AstroSystems provides the epoxy, as well as rubber gloves, brushes, wooden "popsicle" sticks and several plastic cups for mixing it up. My sequence of assembly was to do the easy parts first, hoping that any lessons learned along the way would be applied to the more difficult operations later on. And, by the way, nothing on the kit was difficult, per se - It just takes time, persistence and attention to detail. The first epoxy to go down was on the mirror board, where I had to attach the travel posts, mirror sling support posts and mirror box lid support posts. 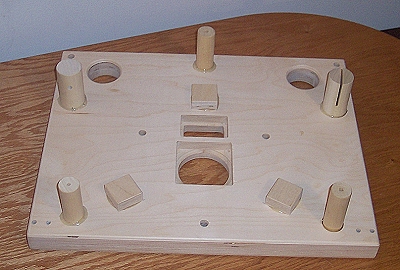 Next came the ground board, mirror box, rocker box and end cage. The epoxy supplied by AstroSystems is a slow cure formulation that allows plenty of time for repositioning (almost too much time; more on that later). Once the epoxy cures (three to four days, just to be safe), a router comes in VERY handy to knock off the excess wood as well as round over the edges. The job could be done with nothing but sandpaper, but I wouldn't try it! Speaking of sandpaper, there's sanding... sanding... sanding... sanding, and did I say, there was sanding? Not that the wood is rough - On the contrary, it's already very smooth, but there just seems to be no end to how it improves with sanding, so you tend to keep on and on and on and on and on, trying to reach Baltic Birch Nirvana. Plus, I always seemed to notice some little patch that I had missed, just before starting the next stage of assembly, so that meant doing some more sanding, and sanding, and san.... Anyway, you get the picture. Lots and lots of flour-fine white sawdust everywhere. This is one of the junctures in assembly where I found peer pressure setting it - I had seen all those beautiful TK photos on the web, with all those other flawless TeleKits exuding perfection. I finally realized that if I were looking at those scopes in person, they'd have small little flaws as well, so finally stopped sanding... The Finishing When everything was sanded (or was it?), I started applying the finish. The first coat is recommended to be a 50/50 mix of varnish and solvent, to act as a sealer coat. I used Minwax Helmsman Spar varnish, in a semi-gloss finish. The wood immediately takes on a much richer character with the first application of finish, even despite the thinned mixture. Two to three full-strength coats later, I called it done. The last coat for most of the pieces was a spray of the same varnish. The inside sections that were painted flat black didn't get quite as many coats, since I wasn't interested in a perfectly smooth finish on them. Weeks later, the varnished surfaces were still aging and darkening to a beautiful honey gold color. Final finishing included blackening the inside of the mirror box, 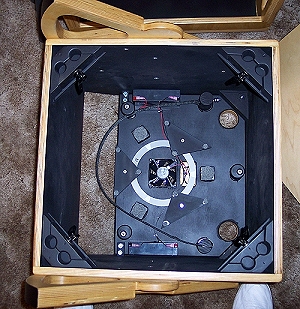 rocker box bottom and end cage. The hardware got attached, the DewGuard installed in the secondary mount and the laminate light baffle in the end cage (unpainted, more on this later). I also ran a power cable from the two (supplied) gel-cell batteries on the mirror board to a jack in the mirror box by one of the truss tube clamp blocks. There's another jack in the end ring that feeds power to the DewGuard. A wire with a plug on each end runs the length of one of the truss tubes. The batteries, mirror fan, control panel and other hardware installed without a glitch. The Lessons-Learned Stories These stories are not meant as a knock toward AstroSystems or anyone else, but rather just as a general heads-up, in the "FYI spirit". All in all, I had very few problems with the Kit and remain very impressed with its overall quality. That being said... I mentioned above that there was almost too much time for repositioning epoxied parts - Here's why I say that, and what I did to prevent problems in one area. After clamping up the rocker box, I checked it for square about six or eight times over the next few hours, at half hour intervals more or less. Using a large drafting triangle, I verified all angles were square on the inside of the rocker box. Once it cured, was sanded, finished and the scope assembled, I discovered much to my chagrin that it was noticeably out of square (at least, noticeably with a carpenters square). Apparently it slipped after my last check that night. Fortunately, it wasn't enough to affect the operation of the scope, and a small (hidden) square of Teflon on the mirror box reduced the net effect to zero. I think part of the problem is the fluidity of the epoxy under pressure. It's thick enough not to simply run, but not stiff enough to hold tightly. All in all, it works fine and there may well be no better solution, but latent stresses in clamps (for example) can cause things to migrate if they're not otherwise registered. To avoid the possibility of movement in the lower truss tube clamp blocks (inside the mirror box), I opted for a positioning method more positive than the simple "clamp while curing" method suggested in the manual. Aligning and pre-drilling holes for the screws allowed for a very positive, non-moving alignment and clamping device during the curing period. 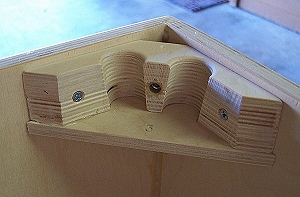 The other lesson learned may well be due to my inexperience with the product, but I opted to line the end cage with ProtoStar flocking paper instead of painting it flat black. First of all, let me say that I'm highly impressed with just how absolutely BLACK this stuff is! In fact, it's so black that it's almost difficult to work with. I had to use a strong light shining directly into the end cage just to see what I was doing! Once I finished covering the inside of the (laminate) light baffle, filter slide box and small brass disc counterweight, it looked like I had sprayed black flocking all over everything. Black, black and delightfully black! After using the scope a few times in the damp, cool air of Louisiana and Mississippi spring nights however, I started to be less pleased. Edges started curling up, wrinkles developed and it just started looked basically tacky. I'll be the first to admit that the rough side of counter top laminate is hardly the best surface for adhesion, but the adhesive on the flocking paper didn't hold on the brass or smooth wood, either. On the one place where it did hold (the filter slide box), it wrinkled nonetheless, indicating a lack of dimensional stability in my opinion. So, I eventually disassembled the end cage (with the exception of the carefully collimated focuser and filter slide), peeled off the flocking paper, masked it all up and applied seven coats of flat black paint before it looked proper again. Once again, I'm not ready to criticize ProtoStar too much, since this is the sum total of my experience with their flocking paper. However, I would have like to have seen a more robust adhesive on it. I've since heard from the manufacturer on this issue and their recommendation is to apply the flocking paper in narrower strips to minimize the dimensional instability (when compared to the average telescope tube). They also suggest gluing it in place. Both approaches may well have avoided my problem, but now that I'm back to flat black paint, I'll think I'll leave it as is for the time being. The Scope in Use At any rate, by the end of March 2004 it was done and I was ready to go observing! I was immediately impressed with the accuracy of balance. When I placed the order for my kit, Randy asked what I would be putting on the end cage, etc. I provided a typical eyepiece, finderscope/bracket weight, mirror diameter, thickness and focal length and diagonal size. After all was said and done, the scope was perfectly usable as is. An additional 8 oz. of weight inside the end cage made up/down motions equal and prevented "creep" when a heavy eyepiece was removed. The roller bearing and laminate/Teflon combination on the motions provides for smooth and partially adjustable movements, although my personal jury is still somewhat out on whether it's better, worse or just different from a traditional "pure" laminate/Teflon Dob. At any rate, the movements are smooth and backlash isn't a problem. There's no positive stop to prevent the altitude bearings from rolling off the roller bearings at low altitudes, but that's not even really a problem. In fact, when "storing" the scope during the day at the Texas Star Party, I would just push it down gently until the front ends of the altitude bearing rolled off the roller bearings and then cover the scope. No problem, and it didn't have a tendency to move up in a breeze. Setup and takedown is easy and quick. The truss tubes are four assemblies of two each, connected at the top by clamp blocks with flip-cam levers. 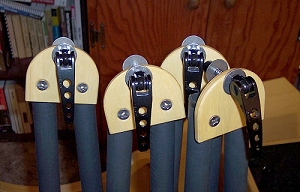 I can do it myself start to finish in about 15 minutes, including wheeling it in and out of my truck. The four-knob, two-axis secondary mount is very nice and quick to adjust. Randy provided me with cable and plugs so I could make custom-length DSC cables, which are routed up the altitude encoder stay arm. 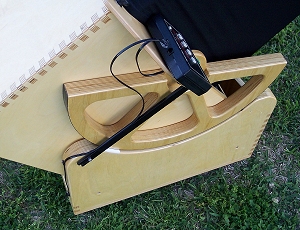 I even had a custom vinyl cover made by a local upholstery shop - After using a similar cover I made for the 10" scope, I was sold on the protection and ease of us inherent in the "box" design. It has since survived without damage some thunderous Texas Star Party storms one evening and the days heat that is a part of the TSP experience. Aside from some dew that condensed the following morning, it was totally moisture-free - The rain found no way in, and it's heavy enough not to require bungee cords or some other form of tie-down. Since it's a box shape, it allows the scope to safely weathervane in strong winds, as well. 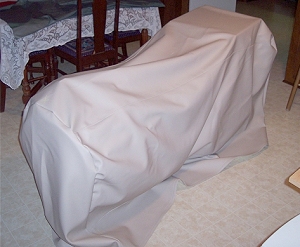 I've since added a small indoor-outdoor thermometer to the scope, with the remote (outdoor) sensor attached to the rear center of the primary mirror. Connected by a layer of thermal silicon grease and covered by a closed-cell foam pad and aluminum tape, it should do a decent job of reporting the mirror's actual temperature. Comparing this "outdoor" temperature against the "indoor", I can get a much better picture of just how well it is (or has) thermally equilibrated. I even added a switch so that the thermometer turns off automatically when the mirror cover is replaced after observing. The Bottom Line Do I like it? You bet! Is it perfect? No, but nothing is and it's VASTLY closer than I could have come on my own (and they continue to improve with each new kit). Did I have suggestions for improvement? Sure - And just about every one of them was minor at best. Would I recommend it to others? Absolutely. Do you need a complete woodworking shop to complete a TeleKit? No - Not at all. A couple of work surfaces, router, sander, clamps and a few other standard tools will pretty much take care of it. If you have the time to spare and like to work with your hands, go for it. You'll be glad you did - Go forth and assemble. 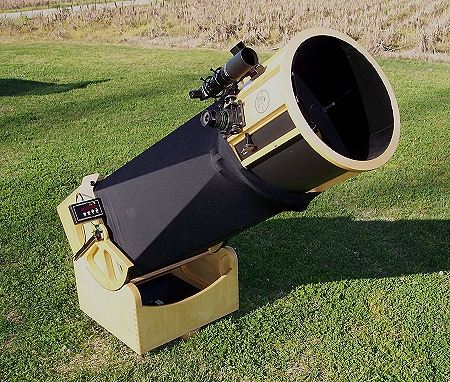 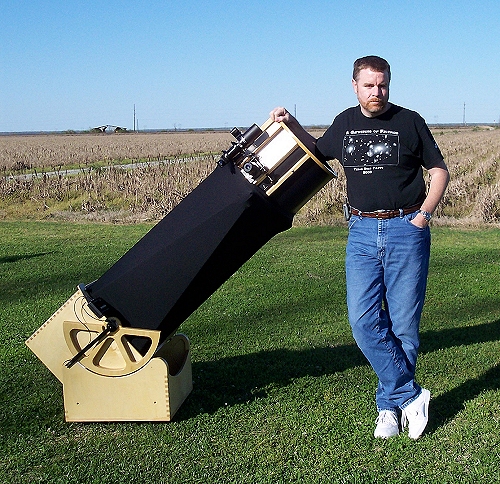 |
